CrackingTheCryptic is an excellent YouTube channel focused on puzzle solving. A viewer of theirs, Derek Neal, recently taught them a new and powerful and quick technique that can shake clues out of an intractable puzzle resiliant to traditional advanced methods. Check it out here:
[Civ V] Move order matters!
YouTuber Martin Fencka finds the correct sequencing of attacks to get the best value. His ranged naval forces of frigates and sole melee land unit in the area (his tercio) are attacking a Spanish city garrisoned by a ship and tercio. This game, Martin has the Honor policy tree, which among other bonuses grants his units +15 hit points when they kill an enemy unit with a melee attack. When a melee unit attacks, it both deals and receives damage, which can be dangerous. By first attacking the city with his ranged ships, he damaged the garrisoning enemy tercio without quite destroying it. This created a window to melee city with his own tercio, causing some damage to the city itself and successfully destroying the enemy unit. Martin’s tercio healed 15 hp by getting the kill, refunding most of the damage it sustained during the attack.
[Apex] Don’t respect the ring too much
A common noob mistake in Apex Legends (and other battle royale games) is to overly respect the play zone. There are a number of factors that make it possible, and even rewarding, to take damage in order to loot, fight, or reposition outside the ring.
- early rings deal low damage
Early rings deal less damage than later rings. The first phase deals only 1 damage per tick, becoming 2 per tick once the first ring finishes closing.
- ring announcement and ring closing both take time
Noobs tend to respond too early to the countdown timers the game provides in relation to the ring. For the first ring, there is a 4 minute countdown between the upcoming ring being shown to players and the start of actual ring movement. The first ring then takes an additional 2.5 minutes to close
- syringes are more common than they are useful, but playing outside the ring puts them to work
The zone deals health damage, not shield damage, but all other sources of damage (except Caustic’s poison gas) hit and must deplete a player’s bodyshield before having the chance to deal health damage. Further, health healing items are slower to use than shield healing ones. As a result, shield healing items are more valuable than health healing items, since health takes damage less often than shields do. Finding a way to productively spend health healing items (e.g. by continuing to loot, fight, or maneuver while outside of the circle) is a way to invest a resource that otherwise are difficult to spend. See article footnote for more details.
- High loot zones at map edge are likely to be outside the first ring
The first ring excludes most of the zones at the edge of the map (since it will include only ~26% of the map), and most zones by the map edge have high loot chances. Since the first ring does low damage, it is relatively worthwhile to continue to loot near the edge of the map for some of the first ring.
*A note on syringes and healing items
Syringes heal only 25 health and takes 5 seconds to activate, as compared with a Med Kit’s 100 healing after 8 seconds, a shield cell’s repairing 25 shield after 3 seconds, a shield battery repairing 100 shield after 5 seconds, and a Phoenix Kit yielding 100 shields 100 health after 10 seconds. The syringe gives the worst bang-for-your-buck in terms of healing power vs time investment. The low value of syringes means that looted areas are relatively likely to still have some lying around, as players usually opt to carry more grenades or ammunition over a second syringe stack. The ability to find syringes in looted areas indirectly reduces the cost a squad incurrs by staying outside the ring and taking damage from it.
[Apex] Drop into high-loot areas, then fight other high-loot squads
Winning in Apex Legends, as in any team battle royale, is a function of individual player skill, teamwork, and (our topic today) squad loot quality.
The best way to equip one’s team with good loot is to land in an area with high quality drop chances. This can mean one of the map zones that always rolls on high tier drop tables, the
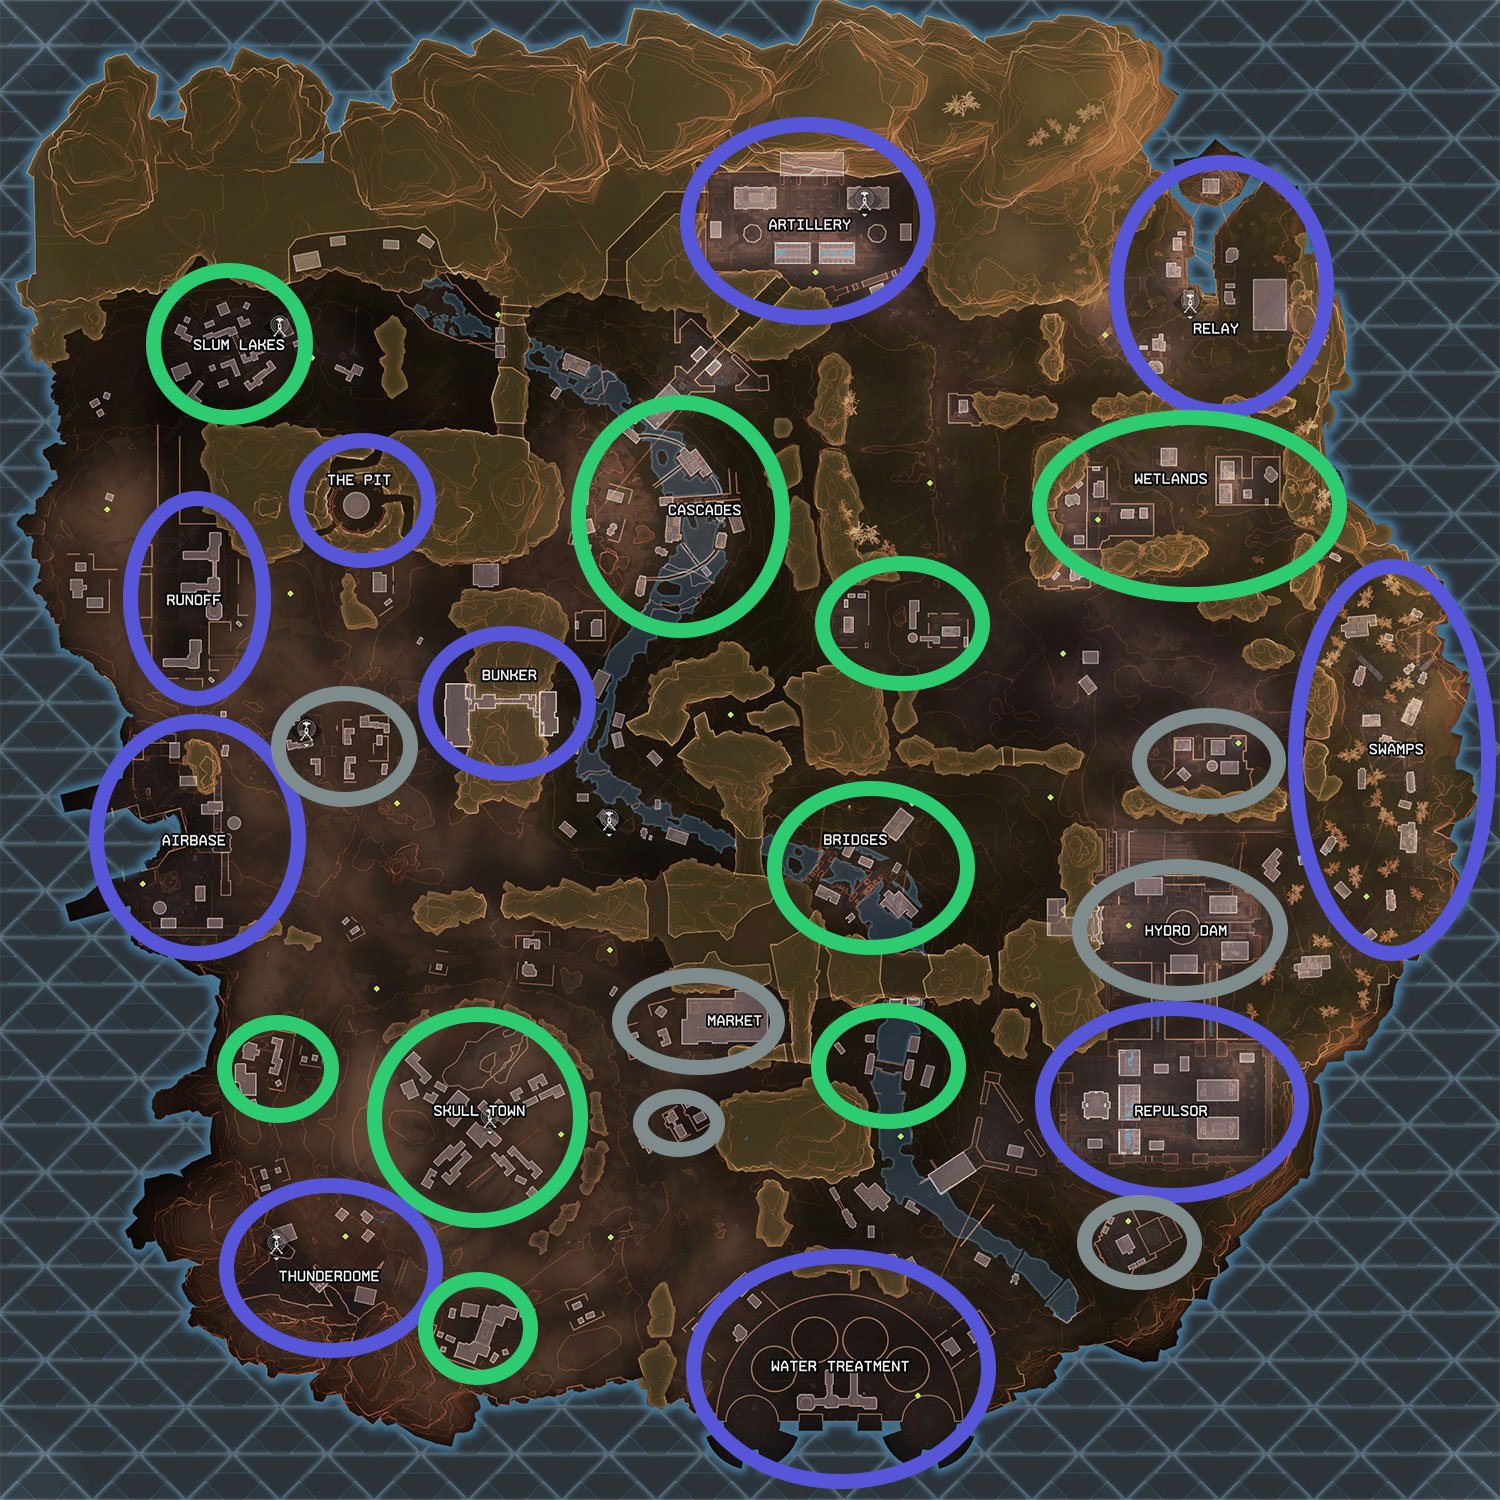
first supply ship or start-of-game blue marked loot zone. Landing in a lower-quality loot area is no guarantee of avoiding a fight, and landing in a high-tier loot area is no guarantee of finding one. If you want to reduce your chances of being involved in a big fight before you loot up a bit (I personally prefer to get right into the thick of it), you should head for one of the high-drop areas (circled in blue) that is far from and late in the initial drop path.
After looting (and potentially fighting over) one of the map’s high loot areas, you should start moving through other zones ASAP in order to snap up the contents of unlooted zones and, more importantly, get the drop on other teams that are split up in their looting. Enemy players represent the highest concentration of loot possible, as they have been visiting many loot piles and taking only the best of what they find. Looting another player is (almost) like looting every spot that player has been to since their landing.
As the early game progresses and the map becomes increasingly looted by remaining squads, killing and looting other players goes from being the best way to gear-up to the only way. By landing in a zone with good drops, you’ll give your team the best chances of winning those critical midgame fights. A proactive looting-and-killing team will exit this phase with high tier armors, weapons, and attachments, as well as higher-quality backpacks that enable them to bring more ammunition/healing/grenades to fights. A team that plays proactively for gear is (usually) going to roll over a less-well-equipped passively-playing team.
So whether or not you land “hot” (amidst enemy squads) or not, you still want to land in a high quality zone that borders on other high-tier zones. After the inital looting, a squad should aim to find other squads, ideally ones that have themselves looted nearby high-tier loot zones.
[PUBG] Tempo and the landing phase
PUBG is a highlander-style arena shooter in which 100 players parachute in to an island and only one team survives. Winners must play for tempo to survive the early game and prepare for the midgame.
Players start with no equipment. Players need equipment to deal and mitigate damage. An advantage in the presence or power-level of one’s equipment is decisive in engagements. For example, a player with a weapon can freely kill a player with no weapon; a level 2 helmet allows one to survive many shots that would kill you in a level 1 helm. The first players to land get first pick of the available equipment.
The quality of loot drops across a map varies with the density of the buildings in an area. A safe and cozy isolated shack is going to roll on a very low quality loot table, meaning weaker armors, weaker weapons, fewer bullets in each pile of ammo, and fewer items in general. A map’s towns and military bases however will have more and higher-tier items. In a smaller village you might be lucky to find a tommy gun in time to fight, but in an a rich area you might well find all that you need on the rooftop you land on.
Areas with rich loot are usually highly-contested, and many landers will die in the early combats, some before they even manage to equip and load a weapon. Players on PC should use the fastest of the three ways to pick up an item:
After the opening’s landing, initial-weapon-finding, and first round of combats have been resolved, survivors will look to assemble coherent ensembles of weapon attachments for the slots on their guns. For example, a player’s sniper rifle could be filled out by finding a cheekpad, an extended rifle magazine, and a silencer. A mini-uzi could fill its slots with an smg compensator, an extended smg magazine, and a folding stock. Additionally, players look to find higher tier armors, and healing items.
“Looting” is what PUBG calls the process of scouring buildings (and bodies) for weapons, attachments, and healing items. The survivors of the initial drop phase that loot most efficiently (without dying…) will find themselves best set up for the midgame. Quick looting involves pathing well through each building, progressing between unlooted structures while avoiding looted ones, and quickly pulling needed items into the inventory. It’s important to learn what each item looks like at a distance, so you can avoid checking each loot pile’s item list and instead prioritize which loot piles to approach and which to avoid.
Tempo in the early game is as critical in PUBG as it is in all games. Developing well means developing quickly. Players use a lead in development to set up unfair fights against those slow to start, and to match those peers of theirs who also develop at top speed.
[Civ V] Free social policies and getting around the normal market rate of resources
It’s always important to look for situations where a resource can be used or accrued in a nonstandard way or at a nonstandard cost. Such situations can let you get a better-than-market value deal by bypassing the usual exchange rate on that resource, so to speak.
In Civilization V, culture is a resource that can be spent to unlock social policies, which are powerful empire-wide bonuses. Normally, each policy you unlock costs more than the last, causing lategame policies to cost upwards of 10,000 culture. There are a rare few means of getting around the normal costs, with effects that unlock a “free social policy.” Free social policies are very powerful because they do not increase the cost of future policies. Stacking two or three free social policies by the midgame can make the cost of one’s 14th or 15th policy come tens of thousands of culture cheaper than normal.
[HoI IV] Deathstacks are bad
We’ve talked in past posts about how concentrated power is more effective than dispersed power. This is largely true, but only to an extent. Once the concentration of force is sufficient to accomplish relevant ends, any more is generally and could have been used elsewhere.
(22:05-22:30) In reviewing the replay of a multiplayer match, YouTuber FeedBackGaming took a moment to appreciate an opponent’s beautifully distributed fleets. Rather than piling his ships up into a single massive group that is only able to fight in one sea region at a time, FeedBack’s opponent created many small fleets that coordinate together to better cover territory.
[CS:GO] Give yourself opportunities to take free value (and don’t overextend)
With less than 25 combined hp near the end of the round, two two surviving members of team CLG are unlikely to be able to contest their high hp and well-armed opponents from team Splyce. They make the smart decision to give up the objective. Instead of forcing a conflict, CLG's players quietly hide, hoping to evade or potentially even surprise and kill one or more opponents. Their patient waiting is richly rewarded when Splyce pushes out from the bombsite, falling into the trap. CLG's lightly-armed players score uphill kills against their better armed and armored opponents. On the following round, Splyce will be forced to burn cash to rebuy the lost weapons and armor:
Warcraft III base design: positioning requires awareness of Range.
Warcraft III pro Grubby recently streamed a guide covering base layouts for various match-ups. Regardless of game, good positioning of an asset relies on understanding the ranges of the attacks and abilities likely to see play, and this certainly holds when we look at Grubby’s building placement advice.
In the orc vs. undead (0:00-6:00) matchup Grubby stresses the importance of protecting key buildings (altar, higher tier unit production) deeper within, away from ranged pressure. Undead generally harnesses the crypt fiend unit, a bulky source of ranged damage. Orc should aim for an open design to permit their own units to kite into the base away from ranged attacks, forcing the crypt fiends to cycle inconclusively between multiple targets or else be drawn deeper into the base to secure kills.
Against human (9:01-12:12), early pressure comes from melee footman attacks. To protect structures, orc should place burrows behind such that the burrow range covers the buildings outer edge. A second early tool from human is a tower rush, where a worker constructs a tower in sight of the mining peasants or key structures. Orc should place burrows so as to cover the spots within tower range of the peon line, where human peasants would have to stand to build a relevant tower. Burrows should be grouped closely enough to protect one another, lest they be isolated and pushed down by footmen/militia/water elemental pressure.
The discussion about orc base layout vs. night elf (12:56-15:00) especially drives home how range impacts placement. The old norm for night elf centered around using the melee Demon Hunter hero. Orc responded by building a very tight base seeking to wall off their front and deny Demon Hunter penetration. The newer night elf approach leans on the ranged Keeper of the Grove hero early, creating a very different type of pressure. Orc has adapted by moving away from a wall-off in favor of a semi-open base. Buildings should be placed to cover up and make impassable the Keeper’s preferred spots for max range harass on the peons. Such placement gives Keeper with fewer and closer positioning options, inviting Keeper to overextend into the orc base. Further, orc uses a burrow extremely close to the peon line, such that peons targeted by Keeper can be microed to safety with minimal travel time, thus minimizing exposure to Keeper’s shots:
The orc mirror (15:06-end) match calls for a flexible start until the opponent’s first hero has been scouted and confirmed to be as the melee Blademaster or ranged Farseer. One wants an option to create a wall against blademaster, with outs to shift towards a more open base once and if a Farseer is spotted:
[Definition] The Principle of Two Weaknesses
A single weakness can be protected, but attempting to compensate for a second one will usually spread your resources too thinly.
Chess broadcaster John Bartholomew gives his succinct definition to this game analysis concept: